
- Guide3
- What's TerrainAxe?
- Make a quick menu for TerrainAxe and your ms files
- Control the Distribution of vertices on an Arc
- FAQ2
- Security Exception
- Stopped working while running(activation issue)
- Reference135
- Select(Poly)14
- SelectBorder
- RingEgs
- FcsToRingEgs
- Findborder
- Nextegs
- CoverFcs
- VertsToEgs
- InnerVerts
- InnerEgs
- FacesByID
- AdjFcsByID
- SameDirFaces
- GetQuadFaces
- RoadSides
- Create(Poly)18
- StitchPoly
- QuickStitch
- SweepEdge
- PiecePoly
- PlaceMesh
- StitchVerts
- PCloudToMesh
- AppendPoly
- LoftSplines
- FreePoly
- ShapeEdge
- DragPoly
- CapEdges
- CrossRoads
- Stairs4
- FreeStair
- IrregularStair
- FacesToStair
- CapStairSides
- Construct(Poly)23
- CurveFitting
- MoveVerts
- InsertX
- ProjToFace
- ConformToRoad
- AdvConnectVts
- ZAlignFace
- ZAlign3P
- SlopePlanar
- Round Verts4
- RoundVerts
- RoundVts(3P)
- RoundVts(Rad)
- RoundVts(TT)
- Smooth Road6
- SMRoadByLines
- SmoothRoad
- SMRoad(Linear)
- SMRoad(NPts)
- SMRoad(Blur)
- SMRoad(Curve)
- Weld Tools4
- Weld1VertToEg
- Weld2VertsToEg
- SuperWeld
- WeldVerts&Egs
- Cut(Poly)18
- ConnectVerts
- Cut2Egs
- Cut2Verts
- PivotCenBot
- CutByAgl
- CutBydir
- CutPerToEdge
- EvenConnect
- ClearJags
- Slice
- SliceByEdges
- SliceByLines
- SliceByFcs
- SliceXY
- SliceByGrid
- SliceBy3P
- Trianglate(Faces)
- EncloseVerts
- UV(Poly)8
- IDByElm
- IDByFace
- PaveCourts
- RingMap
- Advanced UV Mapping4
- RoadPaver
- PaveNoTear
- PaveWall
- Advanced UV Tools
- Others(Poly)14
- SnapToP
- MoveOnDir
- SnapZ
- ZMove
- AdvClearMidVts
- ClearMidVerts
- Flatten Edges
- RightAgl
- ClearChaosEgs
- IDSet
- Check_NarrowFcs
- Extend
- ClearDarkVerts
- ExtendVerts
- Render6
- AbsorbMat
- ArrangeMats
- SimpleTerrMat
- MtlNeaten
- UvwCamera
- Vrcam
- Scenes5
- TrafficLineSys
- AdvArray
- Collapse
- RoadNetwork
- UCS
- Common21
- DropToTerrZN
- DropToTerrain
- CCWShp
- FreeSpline
- FlatShps
- RefRotate
- MoveObjs
- Explode
- SubdivSpls
- DwgImport
- BlackWire
- DelEmptyObj
- Copy
- Paste
- PickPivot
- ClearSel
- ConnectKnots
- LockTransform
- ResetFile
- ResetXform
- BBoxToTerrain
- Manager8
- AxeSetting
- Clean Layers
- Simple Display
- QuickMenu
- LifuBar
- UIMan
- On/Off TheAxe
- SegsVsArc
- Select(Poly)14
AdvArray
Introduce
AdvArray is for placing a large number of railings on the terrain.
The array path can be a spline , continuous edges (or egdes arraying in ring mode) of a polygon object ,or a line by snapping points.
AdvArray features real equidistance,which means the distance between any two adjacent cloned objects is always the same,not the length of the path between the two objects.
Array Object on curve path
How To
Set the post’s pivot correctly
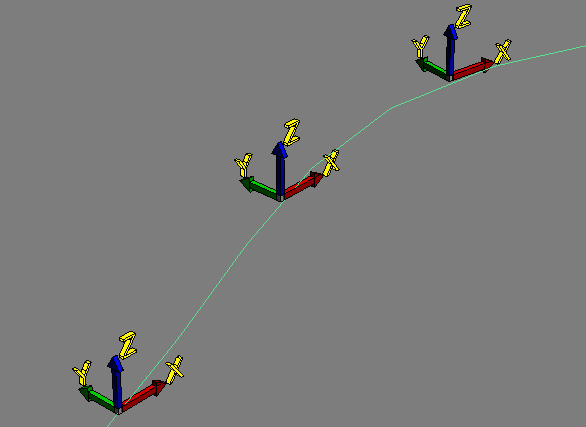
Set the post's pivot correctly
For any cloned post,It's own x axis always aligns the tangent of the path and is horizontal,
and Z axis always keeps up .
Beside that,you also should carefully set the pivot's position to get the result you want.
Parameters
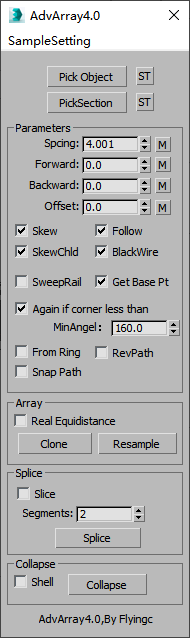
pick Object:Pick the source post object,it's children will be also cloned.Right-Click to open the post libary to select a post object.
- ST:Save currect selected objects into the post libray.Right-click to open the libray folder
PickSection:Pick a splineShape as the section used to sweep,Right-click to open the section libray to select a section
- ST:Save the selected shape into the section libray.Right-click can open the section libray folder
Parameters
Spcing:the distance between neighbour cloned objects.
- [M] Button: Click the button to get the length of the post.
- Right-clicking allows you pick two points to calculate [Spcing] ,which is the length that a line defined by two points projects on the post's X aixs
- Forward:Distance from the first cloned object to starting point of the path.
Backward:Distance form the last cloned object to ending point of the path.
Offset:Distance the cloned object offset form the path.
Skew:When the path rises and falls,the cloned objects will be skewed.
SkewChild:specify whether the children will be skewed.
- Fllow:Make the cloned object' x axis point to next object
BlackWire:Set arrayed objects's wirecolor as black
- SweepRail:Whether sweep rail with picked section splineshape
- CalBase:Ignore it.
RevPath :Clone in reverse direction of the path.
Again if corner less than:Whether cloning begins again at sharp corners specified by [MinAgl]
FromRing:Get a path from edges arraying in ring mode.
Snap Path:If checked ,the path will be got by snapping points.
Array
- Real Equidistance: Make the distance between adjcent objects equal to the value spcified by [Spcing] ,not the length of the path between 2 points.
Clone:Execute Cloning.
Resample:Resample from path and create a new spline.
Splice
- Slice:Slice the cloned object [segments] times so that they can be bend.
Collapse
- Collapse:Collapse cloned objects to one object.
- Shell:Add a shell modifier to cloned objects