
- Guide3
- What's TerrainAxe?
- Make a quick menu for TerrainAxe and your ms files
- Control the Distribution of vertices on an Arc
- FAQ2
- Security Exception
- Stopped working while running(activation issue)
- Reference135
- Select(Poly)14
- SelectBorder
- RingEgs
- FcsToRingEgs
- Findborder
- Nextegs
- CoverFcs
- VertsToEgs
- InnerVerts
- InnerEgs
- FacesByID
- AdjFcsByID
- SameDirFaces
- GetQuadFaces
- RoadSides
- Create(Poly)18
- StitchPoly
- QuickStitch
- SweepEdge
- PiecePoly
- PlaceMesh
- StitchVerts
- PCloudToMesh
- AppendPoly
- LoftSplines
- FreePoly
- ShapeEdge
- DragPoly
- CapEdges
- CrossRoads
- Stairs4
- FreeStair
- IrregularStair
- FacesToStair
- CapStairSides
- Construct(Poly)23
- CurveFitting
- MoveVerts
- InsertX
- ProjToFace
- ConformToRoad
- AdvConnectVts
- ZAlignFace
- ZAlign3P
- SlopePlanar
- Round Verts4
- RoundVerts
- RoundVts(3P)
- RoundVts(Rad)
- RoundVts(TT)
- Smooth Road6
- SMRoadByLines
- SmoothRoad
- SMRoad(Linear)
- SMRoad(NPts)
- SMRoad(Blur)
- SMRoad(Curve)
- Weld Tools4
- Weld1VertToEg
- Weld2VertsToEg
- SuperWeld
- WeldVerts&Egs
- Cut(Poly)18
- ConnectVerts
- Cut2Egs
- Cut2Verts
- PivotCenBot
- CutByAgl
- CutBydir
- CutPerToEdge
- EvenConnect
- ClearJags
- Slice
- SliceByEdges
- SliceByLines
- SliceByFcs
- SliceXY
- SliceByGrid
- SliceBy3P
- Trianglate(Faces)
- EncloseVerts
- UV(Poly)8
- IDByElm
- IDByFace
- PaveCourts
- RingMap
- Advanced UV Mapping4
- RoadPaver
- PaveNoTear
- PaveWall
- Advanced UV Tools
- Others(Poly)14
- SnapToP
- MoveOnDir
- SnapZ
- ZMove
- AdvClearMidVts
- ClearMidVerts
- Flatten Edges
- RightAgl
- ClearChaosEgs
- IDSet
- Check_NarrowFcs
- Extend
- ClearDarkVerts
- ExtendVerts
- Render6
- AbsorbMat
- ArrangeMats
- SimpleTerrMat
- MtlNeaten
- UvwCamera
- Vrcam
- Scenes5
- TrafficLineSys
- AdvArray
- Collapse
- RoadNetwork
- UCS
- Common21
- DropToTerrZN
- DropToTerrain
- CCWShp
- FreeSpline
- FlatShps
- RefRotate
- MoveObjs
- Explode
- SubdivSpls
- DwgImport
- BlackWire
- DelEmptyObj
- Copy
- Paste
- PickPivot
- ClearSel
- ConnectKnots
- LockTransform
- ResetFile
- ResetXform
- BBoxToTerrain
- Manager8
- AxeSetting
- Clean Layers
- Simple Display
- QuickMenu
- LifuBar
- UIMan
- On/Off TheAxe
- SegsVsArc
- Select(Poly)14
RingMap
Introduce
RingMap is mainly used to UV Map quad strips,so you can know it is very good at texturing curved roads
RingMap also can UV Map other various types of pavements ,such as grass,squre.
RingMap works in the same way as [Road Paver],but the later is more suit for a big amount of UV Mapping tasks.
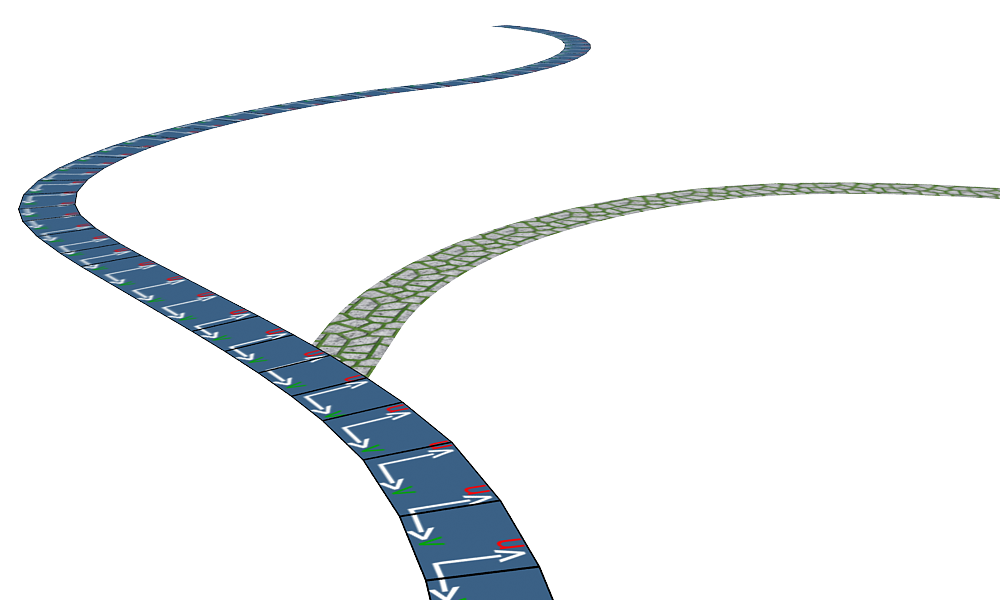
UV mapping for road
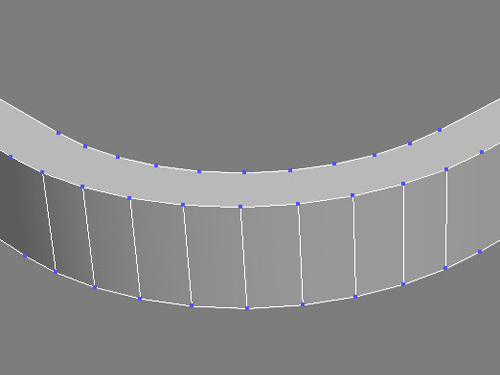
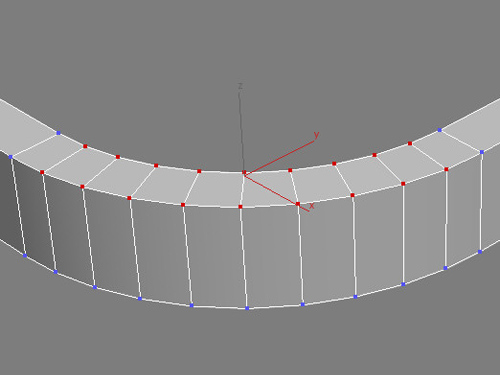
Observe the topology of this kind of surfaces ,you can find they can be created by a path and a section,such as using loft compound object or sweep modifier.
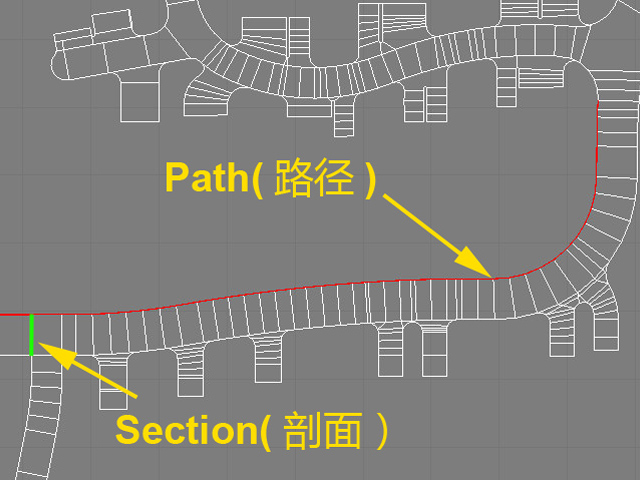 the path and the section of a curve road | 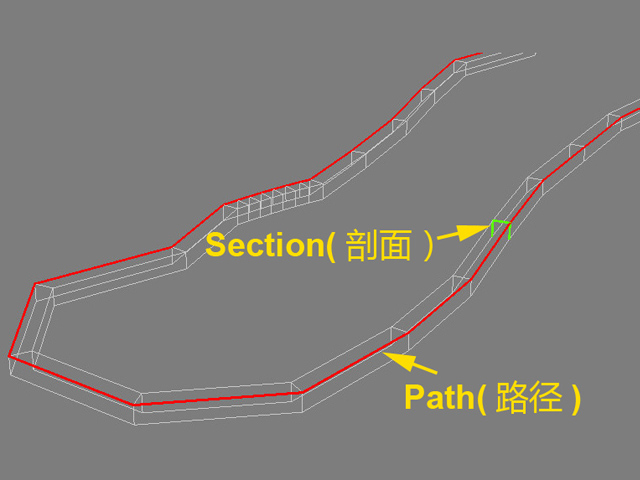 the path and section of a curb |
How To
Use RingMap to UV Map a road
RingMap
UV Map a park
puvm
Parameters

RingMap
StEg: Set the range of edges.
Ring:Press the button to select edges and faces in ring mode
Ring Map:UV Mapping for selected faces
Extend:
Extend
Add:If you also complete a part of road UVMapping and want to continue your job for remain road,you can check it . To make sure adding RingMap at your desired position,Select a vertex at beginning of the road.
Full:Fill the texture along the road section,that is,set U coordinate on one side to 0,another side to 1.
RingV: Default,the V coordinates increase along the path.If check,the direction will be change to U;
FlipU:Flip U coordinate
Backward:Make V coordinate(or U if check "VRing") decrease along the path of road. ----------------------------------------------------------------------------------
Patch:Use the adjacent face UV data to UV Map for selected faces
PatchByDir:Make UV patch along specified direction.
Patch and PatchByDir
2P UV:UV Mapping for selected faces along specified direction
3P UV:UV Mapping for selected faces with the direction and the UV width defined by 3 points
FreeUV:With Apply a simple planar UVW Mapping to selected faces
FullUV:Apply UV Mapping with UV width defined by bounding box by selected faces
Show Texture:Get the diffuse texture of the current selected face and display it in the above picture region,the U and V width will also be get into the "U width" and "V width" text editor.
U (or V) :Get the length of the selected edge as U (or V) width. U (or V) Width:Set width of U or V.
Swap UV:Swap U and V coordinates for every selected UV vertex
Move: Move UV vertices
U off:Move UV vertices along U direction
V off:Move UV vertices along V direction
Rotate:Rotate UV vertices
Tips
Note That
There are some requirements for models applied ring UVMap tools,the details as below:
Section construct line muse be full ,or UV mapping will stop;
- For PaveUV and PaveWall,source model is simply polygons connected by parallel edges is OK,sides number of every face can more than four,but cant be less than four;
Broken section construct line
Right topology
PaveNoTear:The shape of section can be arbitrary ,this is not like previous tools which section is simply a line .Also,the tool can pass through non-quad polygon.