License Server for TerrainAxe is a program running in host PC ,with which you can run TerrainAxe on multiple PCs in a same local network.The number of PCs that can run TerrainAxe is the number of licenses.Once you start License Server you can active TerrainAxe on client PC.
Many users are used to learn one by one all tools of a software ,but it is not really a good idea,because even though you can manipulate all tools,but you will be puzzled, you don't still know when and how and where to use them ,and don't know why the tools exist.
As we know, terrain landscape modeling is a very hard work,it is not like surface modeling which can use few control points to control complex modeling,and not like building modeling which can be freely pick a part of entire model to modify ,because it is generally regular .Terrain landscape modeling need often disruptive modification on terrain.For example,you are going to make roads on terrain,where are you begin?Use boolean and comform deform object as before? Another example,if your modeling has been completed ,but you need to hack a clearing from terrain to place a building by the side of the road ,which tool will you first call in mind? Some users generate curb,sideway and stone paving ,but roads are still flat,how to do after ajusting level difference of roads? how to do in next connecting work to terrain?
So ,it is impossible to modeling for terrain landscape as modeling for other type of scense,we need a new completely different idea to guide us to find an efficent workflow,which can avoid plenty of unusful jobs.The peculiarity of terrain landscape modeling decide there is only one workable thread,which has been write in the article MAIN THREAD OF MODELING TERRAIN LANDSCAPE .It is a very important arcticle. It is very necessary to read the arcticle before learn TerrainAxe. The thread is the most direct and efficient we can find,because of which every tool exist.Follow the thread to search tools you desired and understand them,thus you can freely use TerrainAxe .
Why use a software like Civil3D to modeling terrain landscape?Maybe somebody ask.It is really a powerful software,but first of all,this type of automate software need complete data ,but the data we can have is generally insufficent;Also we have many individuation requirements,which can be solved by ajust data or parameters.Only preparing many individe tools to let users freely combinate them can meet our defferent requirements,this is also the time to show the power of TerrainAxe.
Hope everyone who is interested in TerrainAxe can realize earlier the value of the software.
Clear selection,if current selected object is in sub-object object level , will switch to object level and deselect
Copy:
Copy selected objects.
Paste:
Paste objects stored by Copy tool to the scene,if right-click in view,the new objects will retain their origin positions .If left- click in the scene,the new objects will move to new position.
DelEmptyObj:
Delete the objects that have not any
DwgImport:
Quickly Import dwg file.
PivotCenBot:
Set pivot of each selected object to it's bottom center.
PickPivot:
Snap a point and set it as current object's pivot.
ConnectKnots:
Connect two selected vertices of a spline shape.
FlatShp:
Flatten all selected spline shapes.
FreeLine:
Free to draw spline shape.
SubdivSpls:
Base on allowed min distance and curvatures of each segments to subdivide selected spline shapes.
Explode:
Explode selected object,if Editable poly,then detach each element as a single object;if splineshape ,will detach each spline.
MoveObjs:
Move selected objects from one point snapped to another one.
DropToGrnd:
Move each selected object along z-axis to ground surface .
DropToGrndZN:
Move each selected object along z-axis and normal align to ground surface.
RefRotate:
Rotate selected objects like in AutoCAD,Snap first point as rotation center,second point with first define start angle,snap third point with first as rotation end.
---Total 356 views---
---Total 356 views---
Other(Poly)
503
ClearMidVts,AdvClearMidVts
ClearMidVtsDelete the verts which has only two edges,regardless of their angels. AdvClearMidVtsDelete the verts which has only two edges,but that verts which angel is smaller than threshold value will be ignore.
SnapZ | ZMove |SnapToP
SnapZSnap a point and set all z coordinates of selected vertices to z value of the point coordinates. ZMoveSnap two points ,move selected vertices in Z-AXIS from first point to second one.
MoveOnDir|FlattenEgs |RightAgl|ClearChaosEgs
MoveOnDirSnap two points as direction, which the selected verts will move along on moving mouse. FlattenEgsOne by one make each of selected edges flat. RightAglOne by one ,make each selected edge perpendicular to an arbitrary adjcent edge. ClearChaosEgsClear these co-plane edges which can cause visual chaos.
Check_NarrowFcs
Find extreme narrow polygons and select them.
ClearDarkVerts
Select those vertices that make surface looks dark.
---Total 386 views---
---Total 386 views---
Install TerrainAxe
211
Requirements
Operating System:64 bit windows 7~windows 11
Supported 3dsmax version:64 bit 3ds Max 9 ~2026
DON'T COPY the package into 3dsmax folder or SYSTEM driver,it should be placed in a safer place.
The folder name for storing the package don't start with lowercase x ,n,t or r.
Don't delete the package after installing TerrainAxe.
For 3ds max 9 and 2012,you need install their very own sp2 .
Don't place TerrainAxe in a network location.
If can't click buttons of TerrainAxe UI,please change the current theme of your windows to the classic theme
Installation
Drag and Drop the UIMan.ms file into 3ds max window(Or click menu MaxScript->run script to choose the UIMan.ms file,which is in the Installation package ).
In the popped UIMan window , click "Install" to complete installation.
Set hotkeys Select"Customize->Customize user interface" command from 3dsmax menu , in the "Keyboard" tab , pick "TheAxeTools" from the "Category ",you will find all commands of TerrainAxe .
Trial
If you are a new user of TerrainAxe.You can get a free 15-days license of the Basic Version.
This free license will be created when you first click the "activate" button the Activate dialog.
To open the activate dialog,you can simply click the activate button in UIMan
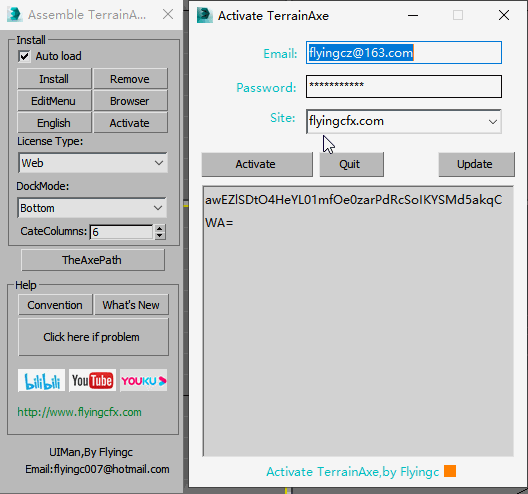
Activate
To run TerrainAxe, you need to register an account on our website using your email, which will be used to activate your TerrainAxe.
The email used for sign-up should be the same email with which you purchased TerrainAxe.
Ensure "License Type" is set to "Web" in UIMan
Click "Active" button in UIMan to pop up the active window, enter the email, password of your account
Click "Activate" button to complete activation, close the activation dialog.
if you want to swich the PC for running TerrainAxe and the duration running TerrainAxe is within 2 hours ,Please Click "Quit" to quit the current TerrainAxe session.
Click "Update" will update the initial files to the latest verison.
---Total 4,277 views---
---Total 4,277 views---
Scene
192
Tools used to create objects for scene,such as roadlines,advArray
UCS
AutoCAD style User customized space(UCS) tool,you can use the tool to built any work space you want .
UCS
The functionalities from left to right are:
3P UCS,pick 3 points ,the first as origin ,the second with the first as Y axis,the third with the first as Z axis;
2P UCS,pick 2 points to create a plane as XY plane of new UCS,which is through the two points and perpendicular the XY plane of world space.
Face UCS,click on a face of a geometry ,the face plane will be as XY plane of new UCS.
UCS from world, move the origin of the world space to picked point to create a new UCS.
Move UCS,move the origin of current UCS to a new picked point.
Back to previous UCS.
Return to World space.
Use ZX plane of world space as XY plane of new UCS.
Use ZY plane of world space as XY plane of new UCS.
Use Z coordinate of picked point as orign of world space.
Change current view to top view of UCS.
OBJ,use the pivot of select object as UCS.
AdvArray
Advanced Array tool,which can clone objects in EQUAL distances from each other.
Parameters
pick ObjectPick object used to clone,whose children will be also cloned if has. PickSectionPick section splineShape used to sweep along path. Spcingthe distance between neighbour cloned objects. SharpAglSharp angle.If encounter sharp corner small than the angle in the path , the array will be begin again. ForwardDistance from the first cloned object to starting point of the path. BackwardDistance form the last cloned object to ending point of the path. OffsetDistance the cloned object offset form the path.
AdvArray
RevPath Clone in reverse direction of path. CalBaseCan be ignore. SkewWhen path rise and fall,the cloned objects will be skewed. SkewChildspecify whether the children will be skewed. Corner AgainWhether cloning begin again at sharp corner specified by [SharpAgl] SweepRailWhether sweep rail with picked section splineshape. BlackWireWhether cloned objects with blace wirecolor. ArrayExecute Array. ResampleResample from path and create a new spline. LinarCopyArray along broken line Bypickwhether use cursor to draw the path. EvenSpaceUse approximate spacing clone objects,avoid blank appear. CollapseCollapse cloned objects to one object. ShellAdd a shell modifier for cloned object
The change of pivot when cloning|Seamless array|Affect of Skew Option
Samples
RoadlineSys
Collapse
---Total 377 views---
---Total 377 views---
UV
190
Ring UVMap tools
Original,Ring UVMap tools is simply for curve road UV mapping,and then their applications extends to curb,flower terrace and wall etc.The common features of this kind of model is that ,a path and a section can be found through their topology,and the same model can be re-create with loft compound object or sweep modifier.
the path and the section of a curve road
the path and section of a curb
There are some requirements for models applied ring UVMap tools,the details as below:
1.Section construct line muse be full ,or UV mapping will stop;
Broken section construct line
Right topology
2.For RingMap8.5,source model must be quad faces connected by parallel edges,every face must be quad.
3.For PaveUV and PaveWall,source model is simply polygons connected by parallel edges is OK,sides number of every face can more than four,but can't be less than four;
4.PaveNoTear:The shape of section can be arbitrary ,this is not like previous tools which section is simply a line .Also,the tool can pass through non-quad polygon.
AjustUV
The UI is used to ajust UV data for UVPave,PaveNoTear,PaveWall.You can also get UV data from selected faces to change width of UV ,move or rotate map verties
AjustUV
PaveUV
Boosted version of RingMap,which can pass through the polyon more than 4 sides,and get directly ring edges from edge or face selection without storing anything.It's a one key tool and can be used to do big amount UV mapping job.
Tip:If select one vertex at one end of road before apply "PaveUV", the vertex will be as the origin of UV coordinate.
Options for PaveUV
Full Fill the texture along the secion,set U coordinate on one side to 0,another side to 1. BySideAlign the textrue to one side of road,that is,set U coordinate on the side to 0.If you have already select one end vertex,the texture will align the the side the vertex belong .
No checking any option
Full
BySide
AddGet UV information from other side of start edge,and extend its UV coordinates; FlipFlip U coordinate; VRingDefault,the V coordinates increase along the path.If check,the direction will be change to U; SlopeBe applied to slope ,the texture will pave along the bottom side. BackMake V coordinate(or U if check "VRing") decrease along the path of road.
Add
Add with Back
Pave UV
PaveNoTear
The tool is used to fix the problem of distorted texture .The vertices will tear the texture on modle because of curve along the path.You may be have noticed the model created by loft or sweep.Generally,the distortion can be ignored,but can't when sharp corners do exist.
Before apply PaveNoTear
After Apply PaveNoTear
Before apply PaveNoTear,you need to specify a range of loop edges along the path to make the program know where UV Mapping should begin. If the section of model is not closed,the tool itself can find the begin edges;but if closed, you need to manually specify them.
Pave No Tear
PaveWall:
The map vertices UV of wall polygon strips is different from previous UV pavings ,wall texture should keep texture level ,such as brick texture.PaveWall was designed for this situation and work in a manner similar with PaveUV.
Pave Wall
---Total 714 views---
---Total 714 views---
PolyCut
188
Easy to use and quickly cutting tools,help you rapidly construct the topology for your model.
CutPerToEdgeCut from each of selected vertices perpendicularly to the selected Edge. (more…)
---Total 972 views---
---Total 972 views---
Construct
186
RoundVerts
RoundVerts tools not only round vertices ,but also optimize poly object by decreasing or increasing the number of vertices .Usually ,road net is turned from spline shape, the number of vertices in corners maybe insufficient or too many,you often need to keep a balance between number vertices and accuracy.With RoundVerts tools ,you don't worry about the steps in shape-editing stage.
RoundVerts:
A RoundVerts tool with UI,you can manually input parameters such as the number of vertices and the radius of an Arc .This tool provide 3 methods to control how to round vertices:
RoundVerts
Tan2Edge the arc tangent to two edges.
Tan1Edge the arc of vertices tangent to one edge.
ArcTo3p the arc through three points, two is the positions of two end vertices,one is a point snapped,moving mouse can change arc radius.
Below 3 RoundVerts tools is all one-key, more powerful and very rapid, which use more efficent methods to round verts,can auto figure out radius of arc and how many verts should be remained.
Auto RoundVerts Tools:ArcVts(3P) | ArcVts(Rad) |ArcVts(TT)
ArcVts(3P)Select at least three continuous verts,from which take start vert, end vert,and a random vert to caculate an arc through these 3 verts to round selected vertices. ArcVts(Rad)Fillet a vertex and set its radius,or select more vertices to round and ajust its radius through a spinner in UI. ArcVts(TT)Select a continuous vertices(at least 2),take adjacent two edges as tangents to caculate an arc to round.-->
How to Control Number of Vertices on an Arc
Number of Vertices on an arc is controled via "SegsVsArc" under "Manager".For arcs with same degree,the bigger the radius ,the more vertices are needed.So I defined a table to describe the mapping relation:Radius versus degree that each segment of Arc occupy,thus the vertices number on an Arc will be gotten via interpolation.
If you need more vertices,you can follow steps blow:
import an arc(select an segment of a spline or continous vertices which can form an arc) to get the radius
then enter the desired numbers on the arc
press "=>Rescale" .
Then the change will be applied to Auto RoundVerts tools and Piece poly.
The video below show the operating.
Control Number of Vertices
Smooth Road
Make road have a smooth transition from one elevation to anther elevation ,at same time keep road cross-section up-right without tilt . TerrainAxe give you several methods to control how to smooth your road. Before you use this tools ,you need to select a part of border of your road.Maybe you also need to set several elevation for key verts and select them.
Currently,SmoothRoad can only recognize quad polygon,use "Del_midVerts" to remove mid-edge-vertices (which has only two edges)
SmoothRoad:
This tool has a Graphic UI,you can import road data to control curve,ajust curve shape to the road appearence you desired ,then export curve information to road.If you need more effcient methods ,you can use below SmoothRoad tools.
Quick SMRoad
SMRoad(Linear)Base on the elevations of ends of road to make linear transition with the distance from start vertices. SMRoad(Curve)Base on the elevations of start and end vertices of road to make bezier curve transition with the distance from start vertices. SMRoad(nPts) Select a length of road by select border,and set the elevation of key vertices and select,then press a key to smooth the road. SMRoad(blur)Eliminate noise of road and make which have a smooth appearence.This is a very fast smooth method,you just need to select a part of road then press a key.
Weld Vertex to Edge
weld vertices to edges?Yes,Easy to join polygons together,eliminate the seams difficult to observe.
Weld1VtToEgWeld one vertex to one selected edge. Weld2VtsToEgWeld two vertices to selected edge.
By default,above two welding tools will weld selected vertices perpendicularly to selected Edge.
SuperWeldWeld a part of continuous vertices to selected border. Weld_Vts&EgsSelect multi vertices ,the tool will search the nearest edge (if within distance threshold) for each vertex and weld them together. weld_XSelect two edges and one vertex of one of the edges,the vertex will be weld to the intersection of two edges.
Control the behaviour of welding
Run [AxeSetting] in Manager Category ,[AxeToolSetting] Dialog will appear,as shown in the below pic.The options in [WeldtoEdge] Group will control how the vertex is welded to selected edge(s)
[ToTarget]: if checked, the welding of [Weld1VtToEg] and [Weld2VtsToEg] will happen on selected edge ,or at selected vertices;
[Weld]:If unchecked ,no welding happen, [Weld2VtsToEg] and [SuperWeld] will create a polygon or multiple polygons between selected vertices and selected edges;
[KeepTopolgy]:If checked, [SuperWeld] will extend topology lines from old polyons occupied by selected vertices to new created polygons.
[WeldThres]:Welding threshold for [Weld_Vts&Egs].If welding fail or gaps still exist,try to increase the value.
Tools used to change construct of poly,such as move verts to a plane along z axis
Project vertices of ground surface onto picked road surface.the projected vertices is what are overlapped with road watched from top view.
MoveVerts | ZAlign3P | ZPlaneFace
SMEdges
ZRelax
---Total 520 views---
---Total 520 views---
Create
184
Tools be used to create polygon,such as curb of a road,stairs,polygons by piece shapes
FreePoly,DragPoly,CapEdges,ShapeEdges,LoftSplines
Crossroads
Create crossroads with overlapped faces of two roads.Radius of every corners can be changed.
AppendPoly
Ignore "Project" option which simply design for "Make Hole"
"Resample" will convert resampled Editable spline to Editable poly if check "ConvToPoly"
"Make Hole "and "Fill Hole" are deficient functions,ignore them.
StitchPoly
Stitch Poly
Free Stairs
Quickly create stairs for landscape,whose work way is very simple and free,you can just snap 2 or 4 points to easily create a stair,or turn selected quad polygons to stairs with preference settings .
FreeStair:
Use two points as start edges ,or two additional points as end edges to create stair.The points can be from selected vertices or points snapped with mouse.Also,you can create multi-stage free stair which mean there will a platform every specified number of steps.
FacesToStair:
Obviously,FreeStair is not enough if you have too many stairs ,such as hundreds of stairs to build,you can first build stairs to quad-like polygons,which mean the number edges can be bigger than 4,then use the powerful tool to turn them to stairs one time.
IrregularStair
1.Create stair with style lines which can be splines or inner edges of selected faces of polygon 2.Pave steps along a curve path.
CapStairSides
PiecePoly
Splines interlaced with each other will form many closed areas,the process extracting these closed areas as poly faces is called PiecePoly.
The powerful tools is a great resolution to create seamless joined polygons, operating is also very simple.An UI control is also offered which be used to decide the number of vertices how to change with arc radius.
PieceShapes
SweepEdge
Big amount of curbstone creating tool.Actually,it can loft any shape of cross-section,which extrude a cross-section along underlying paths in a way similar to loft or sweep modifier, but can always keep the cross-section up-right and level without twisting.The underlying paths can be continuous edges,splines or NURBS curves, the procedure can auto select the right side of edge to sweep.
There are three situation for different cross-section.
Curb Used to create curbstone,the cross-section is an open rectangle ,you also can create curbstone with side-way,grass ground,or offset a path to create a polygon strip. StairClone a step Repeatedly as cross-section ,sweep along a path to create stair. CustomUse yourself pre-made cross-section to sweep ,you can draw any spline for your cross-section and store it for reusing later ,the procedure can also multiplly clone cross-section to form a new cross-section.