Easy and powerful tools for set map vertices with coordinates for BIG AMOUNT of polygon strips , which CAN pass through more than four-ways polygons,and whose behavior just like paving map vertices for road,so we call this process as Pave UV. (more…)
---Total 819 views---
---Total 819 views---
Weld Vertex to Edge
441
weld vertices to edges?Yes,Easy to join polygons together,eliminate the seams difficult to observe. (more…)
---Total 576 views---
---Total 576 views---
Smooth Road
438
Make road have a smooth transition from one elevation to anther elevation ,at same time keep road cross-section up-right without tilt . TerrainAxe give you several methods to control how to smooth your road. (more…)
---Total 732 views---
---Total 732 views---
RoundVerts
436
RoundVerts tools not only round vertices ,but also optimize poly object by decreasing or increasing the number of vertices .Usually ,road net is turned from spline shape, the number of vertices in corners maybe insufficient or too many, (more…)
---Total 496 views---
---Total 496 views---
Forums
337
[bbp-forum-index]
---Total 267 views---
---Total 267 views---
Convention
214
The convention for using TerrainAxe as below.
Build objects with Meter,or some tools may not work properly.Set "System Unit Scale" to "Meters" or "Feet" in [System Unit setup],and modeling with real size.For example,if the real road width is 20 meters,then the amount of it should be set to 20, not 20000 or other number.
Convert objects to Editable poly.This is because most of the tools work with poly objects.You also need to know most tools have no effect on EditPoly modifier.
Remember that the farther the object is away from origin,the bigger the error gets. the center of scene must not be too far away from origin,otherwise the vertices position of an object is not correct,for example ,vertices of splines from AutoCAD is become jagging.
---Total 1,514 views---
---Total 1,514 views---
Install TerrainAxe
211
Requirements
Operating System:64 bit windows 7~windows 11
Supported 3dsmax version:64 bit 3ds Max 9 ~2026
DON'T COPY the package into 3dsmax folder or SYSTEM driver,it should be placed in a safer place.
The folder name for storing the package don't start with lowercase x ,n,t or r.
Don't delete the package after installing TerrainAxe.
For 3ds max 9 and 2012,you need install their very own sp2 .
Don't place TerrainAxe in a network location.
If can't click buttons of TerrainAxe UI,please change the current theme of your windows to the classic theme
Installation
Drag and Drop the UIMan.ms file into 3ds max window(Or click menu MaxScript->run script to choose the UIMan.ms file,which is in the Installation package ).
In the popped UIMan window , click "Install" to complete installation.
Set hotkeys Select"Customize->Customize user interface" command from 3dsmax menu , in the "Keyboard" tab , pick "TheAxeTools" from the "Category ",you will find all commands of TerrainAxe .
Trial
If you are a new user of TerrainAxe.You can get a free 15-days license of the Basic Version.
This free license will be created when you first click the "activate" button the Activate dialog.
To open the activate dialog,you can simply click the activate button in UIMan
Activate
To run TerrainAxe, you need to register an account on our website using your email, which will be used to activate your TerrainAxe.
The email used for sign-up should be the same email with which you purchased TerrainAxe.
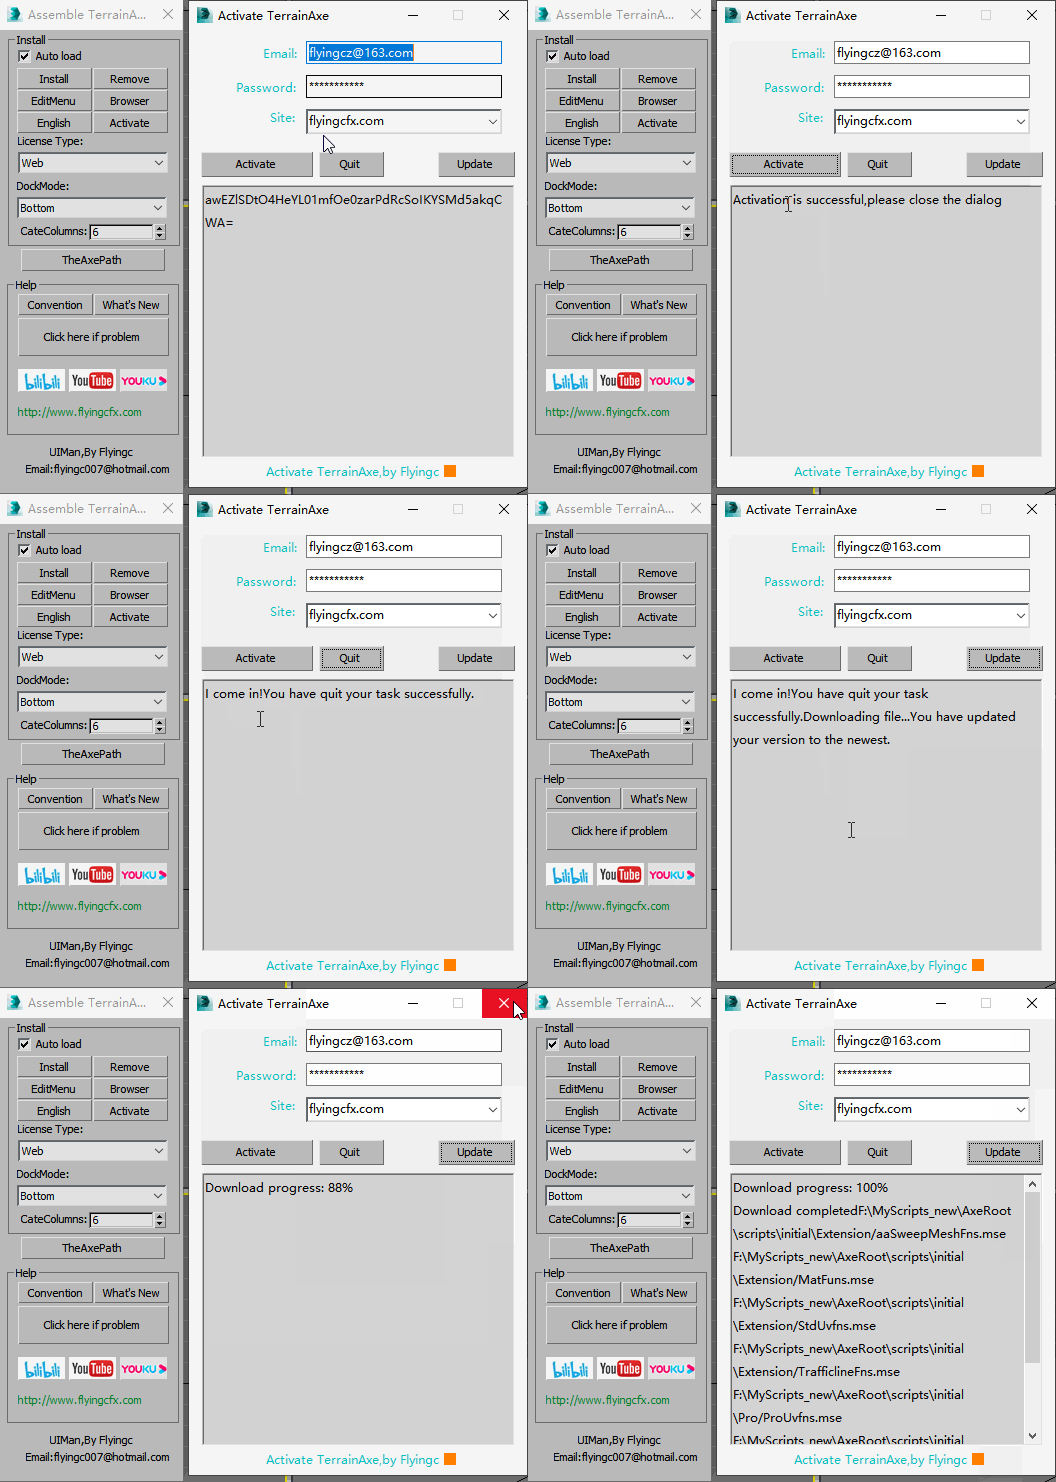
Ensure "License Type" is set to "Web" in UIMan
Click "Active" button in UIMan to pop up the active window, enter the email, password of your account
Click "Activate" button to complete activation, close the activation dialog.
if you want to swich the PC for running TerrainAxe and the duration running TerrainAxe is within 2 hours ,Please Click "Quit" to quit the current TerrainAxe session.
Click "Update" will update the initial files to the latest verison.
---Total 4,461 views---
---Total 4,461 views---
Scene
192
Tools used to create objects for scene,such as roadlines,advArray
UCS
AutoCAD style User customized space(UCS) tool,you can use the tool to built any work space you want .
UCS
The functionalities from left to right are:
3P UCS,pick 3 points ,the first as origin ,the second with the first as Y axis,the third with the first as Z axis;
2P UCS,pick 2 points to create a plane as XY plane of new UCS,which is through the two points and perpendicular the XY plane of world space.
Face UCS,click on a face of a geometry ,the face plane will be as XY plane of new UCS.
UCS from world, move the origin of the world space to picked point to create a new UCS.
Move UCS,move the origin of current UCS to a new picked point.
Back to previous UCS.
Return to World space.
Use ZX plane of world space as XY plane of new UCS.
Use ZY plane of world space as XY plane of new UCS.
Use Z coordinate of picked point as orign of world space.
Change current view to top view of UCS.
OBJ,use the pivot of select object as UCS.
AdvArray
Advanced Array tool,which can clone objects in EQUAL distances from each other.
Parameters
pick ObjectPick object used to clone,whose children will be also cloned if has. PickSectionPick section splineShape used to sweep along path. Spcingthe distance between neighbour cloned objects. SharpAglSharp angle.If encounter sharp corner small than the angle in the path , the array will be begin again. ForwardDistance from the first cloned object to starting point of the path. BackwardDistance form the last cloned object to ending point of the path. OffsetDistance the cloned object offset form the path.
AdvArray
RevPath Clone in reverse direction of path. CalBaseCan be ignore. SkewWhen path rise and fall,the cloned objects will be skewed. SkewChildspecify whether the children will be skewed. Corner AgainWhether cloning begin again at sharp corner specified by [SharpAgl] SweepRailWhether sweep rail with picked section splineshape. BlackWireWhether cloned objects with blace wirecolor. ArrayExecute Array. ResampleResample from path and create a new spline. LinarCopyArray along broken line Bypickwhether use cursor to draw the path. EvenSpaceUse approximate spacing clone objects,avoid blank appear. CollapseCollapse cloned objects to one object. ShellAdd a shell modifier for cloned object
The change of pivot when cloning|Seamless array|Affect of Skew Option
StoreSection
Samples
RoadlineSys
Collapse
---Total 383 views---
---Total 383 views---
UV
190
Ring UVMap tools
Original,Ring UVMap tools is simply for curve road UV mapping,and then their applications extends to curb,flower terrace and wall etc.The common features of this kind of model is that ,a path and a section can be found through their topology,and the same model can be re-create with loft compound object or sweep modifier.
the path and the section of a curve road
the path and section of a curb
There are some requirements for models applied ring UVMap tools,the details as below:
1.Section construct line muse be full ,or UV mapping will stop;
Broken section construct line
Right topology
2.For RingMap8.5,source model must be quad faces connected by parallel edges,every face must be quad.
3.For PaveUV and PaveWall,source model is simply polygons connected by parallel edges is OK,sides number of every face can more than four,but can't be less than four;
4.PaveNoTear:The shape of section can be arbitrary ,this is not like previous tools which section is simply a line .Also,the tool can pass through non-quad polygon.
AjustUV
The UI is used to ajust UV data for UVPave,PaveNoTear,PaveWall.You can also get UV data from selected faces to change width of UV ,move or rotate map verties
AjustUV
PaveUV
Boosted version of RingMap,which can pass through the polyon more than 4 sides,and get directly ring edges from edge or face selection without storing anything.It's a one key tool and can be used to do big amount UV mapping job.
Tip:If select one vertex at one end of road before apply "PaveUV", the vertex will be as the origin of UV coordinate.
Options for PaveUV
Full Fill the texture along the secion,set U coordinate on one side to 0,another side to 1. BySideAlign the textrue to one side of road,that is,set U coordinate on the side to 0.If you have already select one end vertex,the texture will align the the side the vertex belong .
No checking any option
Full
BySide
AddGet UV information from other side of start edge,and extend its UV coordinates; FlipFlip U coordinate; VRingDefault,the V coordinates increase along the path.If check,the direction will be change to U; SlopeBe applied to slope ,the texture will pave along the bottom side. BackMake V coordinate(or U if check "VRing") decrease along the path of road.
Add
Add with Back
Pave UV
PaveNoTear
The tool is used to fix the problem of distorted texture .The vertices will tear the texture on modle because of curve along the path.You may be have noticed the model created by loft or sweep.Generally,the distortion can be ignored,but can't when sharp corners do exist.
Before apply PaveNoTear
After Apply PaveNoTear
Before apply PaveNoTear,you need to specify a range of loop edges along the path to make the program know where UV Mapping should begin. If the section of model is not closed,the tool itself can find the begin edges;but if closed, you need to manually specify them.
Pave No Tear
PaveWall:
The map vertices UV of wall polygon strips is different from previous UV pavings ,wall texture should keep texture level ,such as brick texture.PaveWall was designed for this situation and work in a manner similar with PaveUV.
Pave Wall
---Total 716 views---
---Total 716 views---
PolyCut
188
Easy to use and quickly cutting tools,help you rapidly construct the topology for your model.